Showing posts with label PC Tricks. Show all posts

Friday, 8 November 2013

How to Hide Files & Folders Using Command Prompt


Hello Friends, Hope you all are reading our blog for daily updates after a small gap I have posted some tricks and now I am posting an simple but very useful trick for Windows or PC: Trick to hide files and folders using Command Prompt.

I know that you will think that it is very easy that properties method but it is not that it is hided by Command Prompt The most important thing is that, once hidden with this method, the files/folders cannot be viewed by any search options even if you click "Show All Hidden Files and Folders". 

Hiding the most wanted files and folders is very important nowadays and it's really a tedious job too. In order to make this tedious job an easy one, i'm going to deliver you a the trick now.
For Example: You have a folder named "Proxy Baba" and this folder is stored in (Disk Drive E). You think that it should not be seen by strangers who use your PC.

The Trick:
For that you need to follow the following instructions:-

  • Press windowkey+R: Run command dialog box appears.
  • Now type "cmd" and hit enter. A command prompt window displays.
  • Now type "attrib +s +h E:\Proxy Baba" and hit enter.
  • The folder "Proxy Baba" will be hidden
  • Note: It cannot be viewed by any search options
  • To view this folder again, use the same command but replace '+' with '-' on both flags 's' and 'h' i.e. type- "attrib +s +h E:\Proxy Baba"
Don't forget to like us on Facebook.

Sunday, 4 August 2013

How to Shut Down PC in a Single Click

Have you ever wondered to shut down your PC or laptop in just a single click. You can do it with the following trick.

Follow these Steps-
  •  Right Click on desktop > New > Shortcut.
 

  •  The following window will appear-
 
 
  • In 'Type the location of item', type-
  • Shutdown.exe -s -t 00    (To shut down Immediately.)
  • Shutdown.exe -s            (To Shut down after 30 seconds.)
  • Choose the name for the shortcut. E.g.- Shut-down.
  • You are done.
  • Whenever you click on the shortcut icon, the system will shut down.
  • You can change the icon of shortcut by right clicking on icon > Properties > Change Icon.
Don't forget to like us on facebook.


Thursday, 18 July 2013

, ,

How to Create a Disposable Mail ID Without Sign-Up

You might have visited the websites which ask you for your email address for opening their services.You can't visit their webpages unless you register with your email.You may not want to give your real email address.And if you give real email address,you will have to sign in to your email to visit the referral link of website.

These days, giving out your e-mail address is a very personal act, as it implies a level of trust that often times you're not willing to give to any random website or app. You're entrusting the site, or app, or company, not to sell or give out your address. You're also trusting their security, that they won't get hacked, or otherwise lose your personal info.

To avoid this you can create a disposable email address and their is no need for sign up-

  • Go to www.maildrop.cc
  • Create your mail id name and click go. e.g.-whatever@maildrop.cc
  • Email is created and you are taken to the inbox.
  • Go to the website which wants your email.
  • Fill in the newly created email.
  • Come back to maildrop and check your message.
Features-
  • MailDrop is a free throwaway e-mail address. It's temporary. It's transient. It's disposable. It's meant for those times when you don't want to give out your real address. Just give someone any e-mail address in the maildrop.cc domain, come back here, put in the e-mail address, and you can see that inbox.
  • MailDrop has no signups. 
  • MailDrop has no passwords. 
  • MailDrop is designed for no security. 
  • MailDrop is designed for little to no privacy. 
  • MailDrop offers the ability to give out a quick e-mail address to any site or app, then after you've established more trust with that site, you can give them your real e-mail address. 
  • MailDrop helps to stop your inbox from getting flooded with spam from that one time you registered on a site which got hacked. 
  • MailDrop can be used to get your receipt for your e-commerce purchase, without signing up to be spammed on a regular basis with "latest offers". 
  • In short, MailDrop can help you cut out the amount of junk in your inbox. 
 

What Kind of E-mail Does MailDrop Accept?

MailDrop is extremely strict about the content of messages allowed into inboxes. Plain text or HTML e-mails are allowed, but must be less than 100k in length. All attachments in messages are removed and discarded - this means no sending files to an inbox.
An inbox can hold at most 10 messages, and any inbox which does not receive a message within 24h will be automatically cleared. Additionally, there is a finite amount of space to store all of the messages in all MailDrop inboxes, so any particular inbox that has not recently received a message may be cleared to make room for more active inboxes.
Content-wise, MailDrop does not allow any e-mail messages having to do with any illegal activities in your country, state, city, or region. Please check with your local law enforcement agency for more information. 

MailDrop Also Blocks Spam.

Before a message makes its way into an inbox, it needs to get through multiple spam filters. These filters are proven to reduce the overall amount of spam by more than 90%, so MailDrop inboxes won't be flooded by junk e-mail. Here are some of the filters that messages are subjected to:
E-mail servers are checked to ensure that they aren't flooding MailDrop with connections, or have bad spam reputations, or are listed on any of multiple network-based blacklists.
From addresses are checked to ensure that messages from a domain are coming from valid e-mail servers in that domain.
All connections are then greylisted, meaning that only valid e-mail servers are allowed to deliver messages to MailDrop inboxes.
Finally, message subjects are checked to make sure MailDrop isn't getting bombarded by the same message over and over again.
Only after a message passes through all of these filters will it be delivered to an inbox. Even though MailDrop may get a huge amount of attempted connections, nearly all spam messages to MailDrop will be rejected. 

Try MailDrop Out - You'll Love It!

The next time a web form or app asks you to "please enter your e-mail address" you'll be ready. "No problem, it's whatever@maildrop.cc." When that site sells your e-mail address, you can shrug, move onto another disposable MailDrop address, and your real e-mail won't get filled with junk mail.
Need some help picking the perfect address? A good strategy is to include the name of the site or app in the address itself, that way you know immediately which sites are suspect with regards to your privacy.
For example: MyGreatAddress.SiteA@maildrop.cc or MyGreatAddress.AppA@maildrop.cc or MyGreatAddress.SiteB@maildrop.cc and so on. 

Don't forget to like us on facebook.

Monday, 15 July 2013

, ,

How to Recover a Stolen Laptop


Think quick, Where's your laptop right now? 
You feel worried until you remember its location.
Imagine how you'd feel if it was lost, misplaced, or stolen? How would you get it and your data back?
When you can't find your laptop, the first thing you want to know is its current location.
It's possible to determine the device's location based on the IP address of the network to which it's connected.

Follow these Steps-
  • Download the software Adeona from here. 
  • Save the setup of this software in CD or Pen Drive because you will need it when your laptop is stolen.Open the file and install it.
  • A window will open and you will see two options Adonea client and Adonea recovery recovery tools.Tick both options.


  • Follow the installation process and enter a strong password.You will need this password at the time of recovery of your stolen laptop.
  • After entering the password press next and a command prompt window will appear.
  • Wait a few seconds for all the tools to be installed and then  press any key to escape. 
  • After everything is installed, the program will put a file on the desktop with a ".ost" extension.This file is the KEY to tracking your stolen laptop so KEEP IT IN A SAFE PLACE.Better save it as email.
Steps to be followed when your Laptop is Stolen-
  • Now when your laptop has been stolen having installed Adonea in it, go to another computer and install Adonea on it but this time tick only the recovery option.
  • Go to the start menu and select the recovery tool option of Adeona then browse and select the file with you have saved in email with 'ost' extension.
  • Now you will be given an option to select the interval of the time and date from the day the laptop was stolen and the number of results you want to see. 
  • Follow the screen instructions and proceed.
Note- The thief has to use the laptop on the internet so that the software installed (ADEONA) on it can get information about the IP address and local network topology. With the info we can pin point the person's location. Sadly if the person does not connect to internet or changes the operating system we can never catch him.

Don't forget to like us on facebook.

Sunday, 16 June 2013

,

What to do if your printer runs out of Ink?

If something has to go wrong it usually chooses to do so at exactly the wrong moment.There are enough weird laws governing this and instances too numerous to list.

One such galling crisis is when you are just about to leave home for the airport at 5 in the morning and you realize that you have not printed your e-ticket.
Switch on the printer and lo! the cartridge has run out of ink.What to do?


The following trick may be temporary solution,enough to extract the last drop of ink in the cartridge and print that last page:-
  1. Power down your inkjet printer.
  2. Open the cover as though to replace the cartridge.Extract the cartridge that seems to be out of ink:in this case black
  3. Switch on your hair dryer and blow hot air on the cartridge for 1-2 minutes.This helps to loosen up any crusted or dried up ink that remains in the cartridge.
  4. Return the cartridge to its slot and power up the printer.Print
Note:- This trick should print a page or two,don't expect to print a report and do not overheat the cartridge.

Don't forget to like us on facebook.

Saturday, 2 March 2013

, ,

Trick to Increase Torrent Speeds in uTorrent


uTorrent Turbo Booster is a recent plug-in designed to improve the functionality of probably the most popular P2P file sharing application around – uTorrent.
This tool comes equipped with modern technology that aims at getting your download speed way up so you can grab the files you want so badly much quicker than you’ve been used to. Movies, music, games, applications, you name it - uTorrent Turbo Booster will deliver at a fast pace. It will be there doing its job in the background without upsetting any other activity you might perform on your computer.
  Another benefit you’ll gain by using this high-end module is a higher number of download sources - more seeds will be available to you than normally discovered by your uTorrent.
A crucial element in choosing a proper accelerator such as this is reaching a full Internet connection tolerating at the same time minimal requirements – well, uTorrent Turbo Booster does them both. Your bandwidth will get its highest capability and you’ll get low CPU and a happy face.

Besides functionality, uTorrent Turbo Booster shows a bit of style as well. Its interface is neat and appealing; plus, any user will find it quite intuitive and helpful.
What many other such patches come fully bundled with, this strong plug-in lacks. That’s right, folks, NO Adware, NO Spyware, NO Trojans! This little app is clean and solid!

Listed below are some of the uTorrent Turbo Booster’s main attributes:
· Pleasant and easy to operate interface;
· Automatically clears downloaded and incorrect files;
· Automatically resumes paused downloads;
· Operable by system tray icon for convenient and faster use;
· Automatically searches for multiple sources at user-specified intervals;
· Keeps configurations from last run and auto loads on start-up.

Click Here to Download uTorrent Turbo Booster
Don't forget to like us on facebook.
 

Wednesday, 27 February 2013

, ,

Increase Your PC Speed by Increasing Virtual RAM

Hi friends...!
Here's a new trick to boost the speed of your Computer.
You can increse your system virtual RAM by not actually installing it.

Follow the steps given below :-
 

1) Hold down the 'Windows' Key and Press the 'Pause/Break' button at the top right of your keyboard.
Another way is Right-Clicking 'My Computer' and then Select 'Properties'.

2)
Click on the 'Advanced' tab.

3)
Under 'Performance', click 'Settings'.

4)
Then click the 'Advanced' tab on the button that pops up.

5)
Under 'Virtual Memory' at the bottom, click 'Change'.

6)
Click the 'Custom Size' button as shown below:-


7)
For the initial size (depending on your HD space), type in anywhere from 1000-1500, and for the Maximum size type in anywhere from 2000-2500.

8)
Click 'Set', and then exit out of all of the windows.

9)
Finally, Restart your computer.

10)
You now have a faster computer and 1-2GB of Virtual RAM..!
 Don't forget to like us on facebook.


Tuesday, 26 February 2013

, ,

How to Run Firefox inside Firefox?

Hi frnds..!

Now you can open new firefox window in firefox browser.

Above is the screenshot of this trick i.e. firefox in firefox in firefox, which is again in another firefox.

You can run Firefox inside firefox just by typing following url in the address bar:-

 chrome://browser/content/browser.xul


 Don't forget to like us on facebook.

Monday, 25 February 2013

,

How to create a Folder without Name (Nameless folder)?

Hi frnds...!
Here's an amazing trick for creating a nameless folder in PC.

Follow these Steps:-

  1. Make a Newfolder where ever you want.
  2. Right click on this new folder and select Rename.
  3. Erase the text showing "New Folder".
  4. Now keep Pressing Alt (i.e alter key) and type 255. If you are on laptop then you need to enable your Num Lock and type from the highlighted number keys not from those below function keys.
  5. After that leave alt key and Press enter.
  6. You are done.
Don't forget to like us on facebook.

Sunday, 24 February 2013

,

What is the Gender of your Computer or PC?


Hi friends..!
Here's a trick to find gender of your computer or PC.
Is it male or Female?

Follow these steps:-

1.) Open Notepad and paste this code:-  CreateObject("SAPI.SpVoice").Speak"i love you"

2.) Save the file as gender.vbs

3.) Open the saved file.

4.) If you hear male voice then your computer is male and if you hear female voice then its female.

 Don't forget to like us on facebook.

Saturday, 26 January 2013

, , ,

How to View Passwords Saved In Google Chrome.

 
Hi friends....!
I'm here with a new trick to view saved passwords in Google Chrome.Sometimes you forget your password for any website (like- gmail,facebook,orkut,etc.) but you may have saved it in your browser.You can find your  by following these steps:-

• Open Google Chrome
• Click on Settings  on the top right corner of chrome.
• Scroll down & Click on Advanced Settings.
• Scroll down & you will find there "passwords and forms."


• Click on "Manage saved passwords."
• The list of all websites whose passwords are saved will be shown.


• Click on show to view those passwords.
• You are done...! 
 
 Don't forget to like us on facebook.

Wednesday, 23 January 2013

, , ,

How to make Windows XP-sp2 Genuine


Follow these instructions to make windows XP sp2 Genuine:-

1. Click in start and then in run.

2. Type in regedit and press ok.

3. In the regedit, go to this following key:

HKEY_LOCAL_MACHINE\SOFTWARE\Microsoft\WindowsNT\CurrentVersion\WPAEvents

4. On the right panel, double click in OOBETimer

5. In the opened window delete all values and click OK. Shut the regedit

6. Go again in start > run and type:-

%systemroot%\system32\oobe\msoobe.exe /a

7. In the window that opened, choose the option... YES I WISH TO MAKE A PHONE CALL... ( or something similar to this.)

8. In the next step, click in the button that says CHANGE PRODUCT KEY ( or something similar to this.)

9. In the next step, type a CD-Key:

THMPV-77D6F-94376-8HGKG-VRDRQ
and click to update

10. After clicking in the update button, the assistant to activation will return one page, then click in " remember me later ", and restart Windows again.

11. Restart Windows, go again in start > run and type:

%systemroot%\system32\oobe\msoobe.exe /a

12. The following message will appear:

"Windows activation"

You are done & Windows is activated.

 Another Trick To make Windows XP Genuine:-

Start>>
run>>
regedit>>
HKEY_LOCAL_MACHINE>>
SOFTWARE>>
Microsoft>>
Windows NT >>
Current Version >>
WPAEvents >>
Double click OOBETimer >>
Select all and delete >>
FF D5 71 D6 8B 6A 8D 6F D5 33 93 FD >>
Right click on WPAEvents >>
Permissions >>
System >>
Deny Full Control >>
Apply >>
Yes >>
OK >>
Done!
If required,Reboot Your Computer.

Don't forget to like us on facebook.

Wednesday, 16 January 2013

,

Install Windows in just 10 Minutes

Hi frnds...!
I'm back with an amazing trick to install windows in just about 10 mins.
During installation of windows, after the File Copying is Completed, windows Require 39 Minutes We can Bypass this faking Time and reduce it to 10 mins.
How To do it?

Just follow the steps:-


STEP1 : After the Copy Part is Over ... System is Rebooted in general Foramatting Procedure...
After Reboot The Below Image Will Appear....


STEP 2: Now As This Image APPEARS You Have to Press  "Shift + F10 "  . This Will Open The command Prompt...  Now type  taskmgr  in it. This will open the Task manager .

STEP 3 : After The task Manager Opens Goto Processes ... And Find "Setup.exe"  process and Right CLICK on It.... and set the Priority to Highest.... 


STEP 4: Now Just Watch the Set It will take around 9 minutes and 2 minutes for Tolerance(depends on your system).

That was the overall trick.This is really time saving.


Don't forget to like us on facebook.

Sunday, 13 January 2013

Saturday, 12 January 2013

, ,

Advanced Operating System Newly designed for Security


Qubes is an open source operating system designed to provide strong security for desktop computing. Qubes is based on Xen, X Window System, and Linux, and can run most Linux applications and utilize most of the Linux drivers.

 In the future it might also run Windows apps.

>> Key architecture features:

Based on a secure bare-metal hypervisor (Xen)
Networking code sand-boxed in an unprivileged VM (using IOMMU/VT-d)
No networking code in the privileged domain (dom0)
All user applications run in “AppVMs”, lightweight VMs based on Linux
Centralized updates of all AppVMs based on the same template
Qubes GUI virtualization presents applications like if they were running locally
Qubes GUI provides isolation between apps sharing the same desktop
Storage drivers and backends sand-boxed in an unprivileged virtual machine(*)
Secure system boot based on Intel TXT(*)
Download Qubes OS 
  

 Whonix: Anonymous OS:-


Whonix has called TorBOX  is an anonymous general purpose operating system based on Virtual Box, Debian GNU/Linux and Tor.

By Whonix design, IP and DNS leaks are impossible. Not even malware with root rights can find out the user's real IP/location.

This is because Whonix consists of two (virtual) machines. One machine solely runs Tor and acts as a gateway, which we call Whonix-Gateway. The other machine, which we call Whonix-Workstation, is on a completely isolated network. Only connections through Tor are possible.

Whonix is produced independently from the Tor (r) anonymity software and carries no guarantee from The Tor Project about quality, suitability or anything else. Due to trademark issues the project was renamed to Whonix
.
 Don't forget to like us on facebook.

Friday, 11 January 2013

,

Chat with Friends through Command Prompt

Hi frnds..☺☺!
I am here with an amazing trick of chatting with friends through Command Prompt.

Here's the trick:-

1) You need only your friend's IP Address and your Command Prompt.


2) Open Notepad and write this code as it is.....!

@echo off
:A
Cls
echo MESSENGER
set /p n=User:
set /p m=Message:
net send %n% %m%
Pause
Goto A


3) Now save this as "Messenger.Bat".

4) Open Command Prompt.

5) Drag this file (.bat file) over to Command Prompt and press Enter.

6) You would then see something like this:


7) Now, type the IP Address of the computer you want to contact and press enter
You will see something like this:


8) Now all you need to do is type your message and press Enter.
Start Chatting.......!


You are done....!
Don't forget to like us on facebook.

Tuesday, 8 January 2013

,

How to Remove Facebook Timeline


How To Disable Facebook Timeline:-


These days many facebook users want to remove facebook timeline.Here's a simple trick to remove facebook timeline.

You can easily Remove Facebook Timeline using this service called Timeline Remove for Google Chrome,Mozilla Firefox,Safari and Internet Explorer.

Go to:- Timeline Remove.
Scroll Down and select your browser.
Download and Install the extension for your Browser.
Then just restart the browser,your Facebook Timeline will be disappeared.
Other Ways To Remove Facebook Timeline:


Mozilla Firefox Users:
Step 1:Go to this [link] and install User Agent Switcher Addon then restart your Browser.
Step 2:Open Firefox, Press the Alt Key > Open Tools > Default User Agent > Internet Explorer and choose Internet Explorer 7.


Step 3:Open your facebook and refresh your profile page(Ctrl+F5).Thats it now you will get your old profile back with some errors like extra spaces,formatting etc.To remove those errors install this addon for firefox[link]

Watch The Video Tutorial For Demo:

Google Chrome Users:

Step 1:Right click on Chrome.exe Icon and go to Properties.
Step 2: Make sure you are in the ‘Shortcut’ Tab.
Step 3: Paste the following code in the Target window after the : “C:\Program Files\Google\Chrome\Application\chrome.exe”
CODE – For Windows Vista & Windows 7 Users.
–user-agent=”Mozilla/4.0 (compatible; MSIE 7.0; Windows NT 6.0)”
CODE – For Windows XP Users.
–user-agent=”Mozilla/4.0 (compatible; MSIE 7.0; Windows NT 5.1)”
Note: Leave space between
“C:\Program Files\Google\Chrome\Application\chrome.exe”<SPACE>–user-agent=”Mozilla/4.0 (compatible; MSIE 7.0; Windows NT 6.0)”


Step 4:Open your facebook and refresh your profile page(Ctrl+F5).Thats it now you will get your old profile back with some errors like extra spaces,formatting etc.To remove those errors install this addon for firefox[link]


For Internet Explorer:
Our Tweak is to set all the user agents to Internet Explorer 7.So if you are using Internet Explorer 7 then by default you don't get facebook timeline.If you are using updated version then follow the below settings.
Step 1: Open Your Facebook Profile Page.
Step 2: Press Alt Key. Click on Tools > Compatibility View Settings.
Step 3: If facebook.com is already filled in, Click on Add else fill in facebook.com and Click on Add followed by Close.


Step 4:You are done just refresh the page.

If you have any trouble then please leave your comment.Share your experience.

Note:
There is no response from facebook on disabling timeline feature so here we are going to perform a Browser Tweak to disable timeline that will get you back the old facebook view.This will appear only to you and other will be able to see your Timeline Profile.
Don't forget to like us on facebook.

Thursday, 3 January 2013

, ,

Download Youtube Videos without any Software

Hi friends....☺☺
Today I'm posting a trick on how to download youtube videos directly i.e. without any software.

Here's the trick:►

Suppose the link of video you want to download is:-


Just add "ss" before the link


☻☻You are done☻☻

Now you can can download the video just as you download other files.

Don't forget to like us on facebook

Monday, 31 December 2012

, ,

Change bacground image for facebook login page

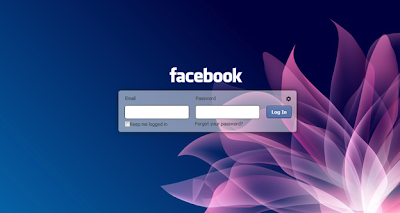
Friends you can see in the below image we have changed the background image and style of Facebook Login Page, well now I just applied some random abstract image, you can go with any one applying your personal or with friends image on the background. So now when ever any one opens Facebook.com on your PC if will be greeted by that image with options to Log-In on Facebook.


Steps to Change FB Background Image:-

1. Make sure chrome is installed now install the FB Refresh Extension.

2. After you have installed the extension now just head over to Facebook.com and you will see that page in a new way something like above but obviously not that image, 
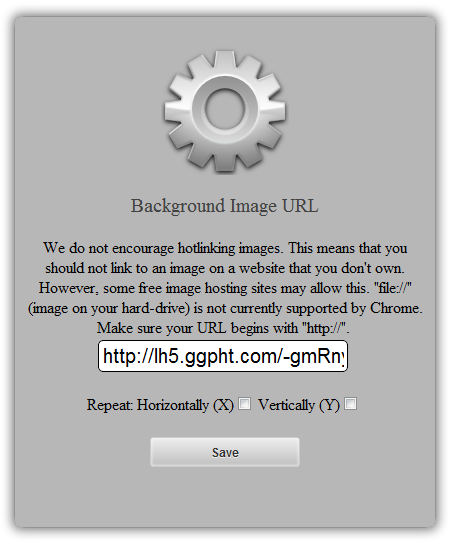
so now you have to click on the small gear icon above the Log In button.


3. Now after you click on the small Gear Icon you will see window like above asking you to insert the image URL for the image you wanna use for the background.

4. Now you can choose if you wanna repeat the image and in which direction X for Horizontal and Y for Vertical